Form: Frame Insertion Point
Use the Advanced > Assign > Frames > Insertion Point command to access the Frame Insertion Point form and assign both the cardinal point and any joint offsets to selected frame/cable objects.
This feature is useful, as an example, for modeling beams and columns when the beams do not frame into the center of the column. It will not generally be needed for modeling cables.
Joint offsets are specified along with the cardinal point as part of the insertion point assignment, even though they are independent features. Joint offsets are used first to calculate the object axis and therefore the local coordinate system, then the cardinal point is located in the resulting local 2-3 plane.
Select the frame/cable object to which the cardinal point or joint offset is to be assigned.
Click the Advanced > Assign > Frames > Insertion Point command to access the Frame Insertion Point form.
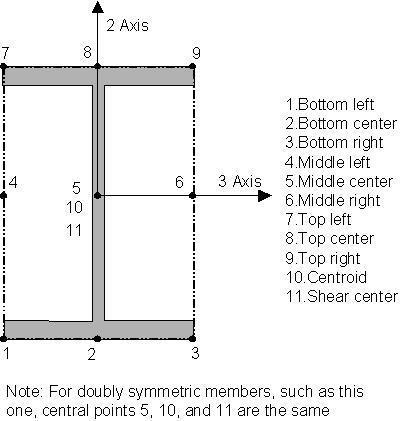
Cardinal Point drop-down list and Mirror about Local 2 check box. Select the cardinal point from the drop-down list. By default the local 1 axis of the object runs along the neutral axis of the section, i.e., at the centroid of the section. It is often convenient to specify another location on the section, such as the top of a beam or an outside corner of a column. This location is called the cardinal point of the section. The available cardinal point choices are shown in the figure below. The default location is point 10.
When the Mirror about Local 2 check box is checked, the program mirrors the selected section with cardinal point about the local 2 axes (i.e., duplicates the orientation of, for example a channel section, as the section would appear if viewed in a mirror) and orients the mirrored section relative to the specified cardinal point.

Coord System. Select the coordinate system within which the cardinal point is being assigned from the drop-down list.
Frame Joint Offsets to Cardinal Point. Specify the End-I and End-J locations in the 1, 2, and 3 axes edit boxes. Sometimes the axis of the object cannot be conveniently specified by joints that connect to other objects in the structure. You have the option to specify joint offsets independently at each end of the object. These are given as the three distance components (X, Y, and Z) parallel to the global axes, measured from the joint to the end of the object (at the insertion point.)
The two locations given by the coordinates of joints i and j, plus the corresponding joint offsets, define the axis of the object. These two locations must not be coincident. It is generally recommended that the offsets be perpendicular to the axis of the object, although this is not required.
Offsets along the axis of the object are usually specified using end offsets rather than joint offsets. See Frame - End (Length) Offsets. End offsets are part of the length of the object, have object properties and loads, and may or may not be rigid. Joint offsets are external to the object, and do not have any mass or loads. Internally the program creates a fully rigid constraint along the joints offsets.
Do not transform frame stiffness for offsets from centroid check box. When this check box is checked, the frame stiffness for offsets will not be transformed from the centroid.
Reset Defaults button. Use the Reset Defaults button to reapply default settings to the selected frame.
See Also